image Microsoft invites you to an exclusive training opportunity:
Microsoft® Exchange Server 2010  Virtual Hands-On Lab

Learn about the new features in Exchange Server 2010 in this half day hands-on lab. Topics include:

  • Exchange Server 2010 Client Access. In this lab, you will configure and test the MailTips functionality within Microsoft® Exchange Server 2010, review some of the new features in Outlook Web App (OWA), and experience using a Microsoft Windows Mobile® Device Emulator
  • Exchange Server 2010 Compliance – Information Leakage Protection and Control. In this lab exercise, you will configure Rights Management Service (RMS) and integrate RMS as a component of Microsoft® Exchange 2010 transport security.
  • Exchange Server 2010 Transport Routing. In this lab exercise, you will simulate failures in various components of Microsoft® Exchange Server 2010 transport and learn about improvements made in high availability and manageability of transport systems.
  • Exchange Server 2010 High Availability and Storage Scenarios. During this lab, you will use the DC01, EX01, EX02, and EX03 virtual computers to gain hands-on experience with the new high availability features of Microsoft® Exchange Server 2010.

Course Modules

  • Exchange Server 2010 Client Access
  • Exchange Server 2010 Compliance – Information Leakage Protection and Control
  • Exchange Server 2010 Transport Routing
  • Exchange Server 2010 High Availability and Storage Scenarios

Who Should Attend:
Attendees should be IT Professionals who are responsible for managing, installing and deploying networking, messaging, conferencing and voice-over-IP technology.

Prerequisites:
To get the most from this course, you will need knowledge of Exchange Server 2003 or 2007 Architecture and installation.

What is a virtual hands-on-lab:
This isn’t your typical IT class. A hands-on lab online is an invite only event that combines LiveMeeting with a virtual lab. Attendees and presenters login from anywhere. Attendees watch a brief LiveMeeting presentation, then spend most of the time getting hands-on experience working through all, or just self-selected modules of the entire lab – at their own pace, and receive real–time, personal, one-on-one attention from the presenter. In addition, there’s a proctor available for technical support and to answer more attendee questions.

Lab Environment System Requirements:

We recommend you test your system here: http://test.vlabcenter.com/hv/default.aspx

Windows

Only Microsoft Windows XP, Windows 2000, Windows Server 2003, Windows Server 2008, Windows Vista, and Windows 7 are supported.

Microsoft Internet Explorer 6 or later

Due to the complex requirements of presenting these Virtual Lab sessions over the internet, only Microsoft Internet Explorer 6 or later are supported.

Screen resolution of 1024 x 768

The Virtual Lab sessions are best viewed at a screen resolution of 1024×768 or greater. Otherwise you may experience clipping of content.

Cookies Enabled

You must have cookies enabled to run these Virtual Lab sessions.

ActiveX Control

The Microsoft "VMRC" ActiveX control is required by this site. If you do not have it installed/enabled, you will be asked to when launching the Virtual Lab.

Firewall

Connecting to the Virtual Lab sessions require that you have port 443 open. Please see your network administrator for assistance.


Registration:
If you are a customer of mine, please contact me for dates/times & registration details as this is a closed training event.
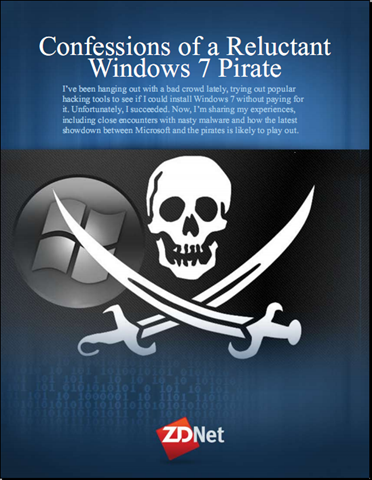
imageEd Bott wrote a rather interesting pair of papers that I think are interesting if not useful reading by any IT Professional involved with the Windows operating system & its Enterprise deployment.

A sample from “Confessions…”:

“I’ve been hanging out with a bad crowd lately.

In the interest of research, I’ve been digging into message boards and forums run by unabashed Windows enthusiasts who are intent on breaking Microsoft’s activation technology. I’ve had these forums bookmarked for years and stop in every once in a while just to see what’s new. This time I decided to drop by and actually try some of tools and utilities to see if I could become a pirate, too.

Unfortunately, I succeeded.

In this post, I’ll share my experiences, including close encounters with some very nasty malware and some analysis on how the latest showdown between Microsoft and the pirates is likely to play out.”

[Read the rest in the download…]

imageA sample from “Windows Activation…”:

“Trust, but verify. That was good advice for dealing with the Soviet Union in its heyday, and it’s equally sound policy today when dealing with that other Evil Empire. You know, the one in Redmond?

Last month, Microsoft rolled out an update to its Windows Activation Technologies (WAT) platform in Windows 7. Everything you’ve read about KB971033 so far, including my report last week, has been based on what Microsoft said it was going to do; in my earlier coverage, I gathered information from blog posts, published privacy policies, a Knowledge Base article, and some one-on-one interviews. But can you really believe everything Microsoft tells you about its new Windows Activation Technologies update?

Now that the update has been publicly available for a few weeks, I’ve been able to dig into it and determine exactly what it does. You don’t have to take my word for it, either. You can download the same tools I used and check for yourself. (And don’t miss my post from yesterday, Confessions of a Windows 7 pirate, which takes a similarly detailed look at the pirates’ toolkit for cracking Windows activation.)”

[Read the rest in the download…]

image You are invited to take part in one or more beta exams for Visual Studio 2010 and the Microsoft .NET Framework 4.

If you pass one of the beta exams, the exam credit will be added to your transcript and you will not need to take the exam in its released form. The 71-xxx identifier is used for registering for beta versions of MCP exams, when the exam is released in its final form the 70-xxx identifier is used for registration.

By participating in beta exams, you have the opportunity to provide the Microsoft Certification program with feedback about exam content, which is integral to development of exams in their released version. We depend on the contributions of experienced IT professionals and developers as we continually improve exam content and maintain the value of Microsoft certifications. The following exams are a part of this beta offering.


Availability

Registration begins: March 17, 2010
Beta exam period runs: April 5, 2010 – April 30, 2010

Receiving this invitation does not guarantee you a seat in the beta; we recommend that you register as soon as registration opens. Beta exams have limited availability and are operated under a first-come-first-served basis. Once all beta slots are filled, no additional seats will be offered. If you register, please ensure you are committed to attend.

Testing is held at Prometric testing centers worldwide, although this exam may not be available in all countries (see Regional Restrictions). All testing centers will have the capability to offer this exam in its live version.

Regional Restrictions: India, Pakistan, China


Registration Information

You must register at least 24 hours prior to taking the exam.
Please use the following promotional codes when registering for your chosen exam(s):

Exam Number/Beta Code

  • 70-511 511BC
  • 70-515 515AA
  • 70-513 513CD
  • 70-516 516B1
  • 70-518 518PE
  • 70-519 519ZS

To register in North America, please call:
Prometric: (800) 755-EXAM (800-755-3926)

Outside the U.S./Canada, please contact:
Prometric: http://www.register.prometric.com/ClientInformation.asp


Test Information and Support

You are invited to take this beta exam at no charge.
You will be given four hours to complete the beta exam. Please plan accordingly.

Find exam preparation information:

image My coworker passed this EHLO post on about Exchange Server.  It was interesting enough to me that I thought it might warrant a repost for those of you involved with Exchange Messaging and the decision to consider Exchange Server 2010.

Top 10 Exchange Storage Myths

Many of you have heard about the changes we’ve made in Exchange 2010 that combine to give you the ability to use less expensive storage and deploy large mailboxes. There have been many discussions around the choices you have around Exchange storage, and along the way we’ve heard some interesting questions. To add some clarity to the discussion, we’ve put together some resources to bust some of the most common myths and mis-perceptions that we have heard.

To help you better understand our thinking around large mailboxes, we’ve published the Large Mailbox Vision Whitepaper.

AND here are the top 10 Myths about Exchange storage that we’ve heard . Busted!

  • Myth #1: Exchange requires expensive, high-performing storage . I can’t afford large mailboxes!
    Reality: Exchange 2010 enables you to implement large, low-cost mailboxes. It performs well on less expensive disks and supports a range of storage options. See the Large Mailbox Vision Whitepaper.
  • Myth #2: Exchange 2010 doesn’t support storage area networks (SANs).
    Reality: Exchange 2010 doesn’t support network-attached storage (NAS) (maybe the similar spelling confuses people ?), but it does support a large range of storage options including SAN and DAS. Depending on your high availability model, storage can be configured using RAID or RAID-less (JBOD) storage. Different customers will require different solutions based on their requirements, but everyone has the ability to deploy large mailboxes at low cost.
  • Myth #3: I already have a SAN (or I just bought one), so it doesn’t make sense to implement DAS. By the way, my SAN can use those less expensive SATA disks too.
    Reality: This one is not really a myth, but it is often misunderstood. SAN deployment may make sense for customers as long as you are able to deploy large mailboxes at low cost. Remember that Exchange supports a range of storage options including SAN and DAS. If you are looking to take advantage of multiple independent copies of databases, then consider the full cost of your storage solution.

Read about Myths 4-10 at the jump.

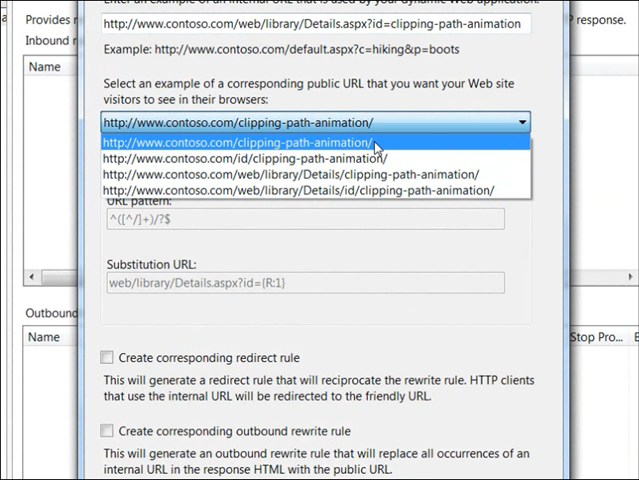
image We just released the free URL Rewriter 2.0 for IIS over at IIS.NET.

In plain English, if you have a URL on your web site that looks like this:
http://www.contoso.com/web/library/Details.aspx?id=clipping-path-animation

…you can now have it be represented on the server with a clean URL like this:
http://www.contoso.com/clipping-path-animation

Besides being easier for your users to use, this cleaner URL is more easily tracked and indexed by search engines increasing your traffic and hit counts.

It actually does a lot more than this however you can read about it’s capabilities here.  If you’re interested in downloading it, check out the URL below:

Posted by: kurtsh | March 29, 2010

RELEASE: Worldwide Telescope App launches in Bing Maps

The WorldWide Telescope Map App allows you to view most real-time telescope data right in Bing Maps. This provides context for where celestial entities are in real time if you were to look up at the night sky. You can navigate the universe the same way you do Bing Maps by grabbing an area and dragging the universe map around.

What’s neat is that when using Bing Maps “streetside view” you are able to basically look up at the sky and see precisely where the stars, planets, & constellations are – IN REAL TIME.  This is important because as we know, the sky looks different depending on the time of year.

HOW TO USE WORLDWIDE TELESCOPE IN BING
One of the things you can do is enable a telescope pointer, which you can drag onto the map.  The map will fade to reveal the constellations above you.  You can also access all the "collections" from the Worldwide Telescope Community, including Constellations, Solar System, All-Sky Surveys, Spitzer Studies, Chandra Studies, Hubble Studies, Astrophotography, Radio Studies, NOAO Studies, Gemini Studies, Messier Catalog, Planets/Moons, Earth (Bing), Panoramas, and Tours. Simply click on a collection, which zips you down to Earth and changes the map style to Streetside (where available). Once you’re on the ground, just look up.

image

image Damn.  Those folks at Springboard have been busy.  Where the heck have I been?

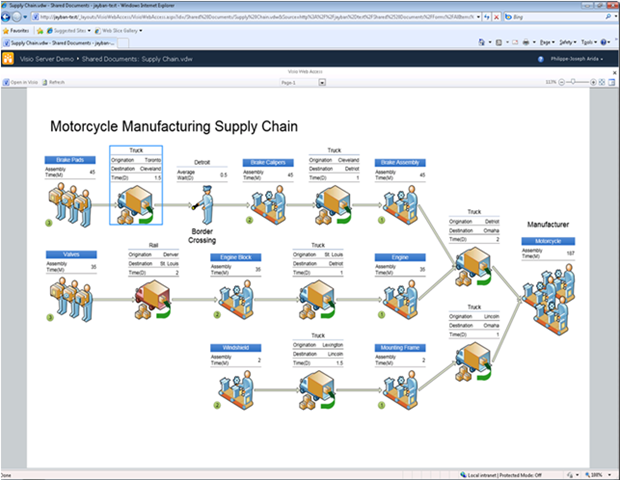
image I’m not even going to pretend that I didn’t miss this.  (Or at least I think I missed this)  It was announced last year around October 2009.  Basically, Visio Services is a server-side rendering engine for Visio diagrams hosted on our SharePoint Server 2010 platform.

INTRODUCING VISIO SERVICES

Last week at the SharePoint Conference, the Visio team unveiled Visio Services – a new feature of SharePoint 2010 that extends the reach of diagrams considerably. In a nutshell, Visio Services for SharePoint 2010 lets you:

  • View diagrams in the browser without needing Visio on your machine
  • Refresh data-driven diagrams in the browser
  • Integrate diagrams into SharePoint applications
Viewing diagrams in the browser

A Visio diagram, saved to a SharePoint document library as a Visio Web Drawing (a *.VDW file) using Visio Professional 2010 or Visio Premium 2010, can be viewed in any web browser by simply clicking on its file entry in the document library.

The diagram renders in full fidelity in the browser if the person viewing the diagram has Silverlight installed on their machine or as a PNG if not; Visio Services renders seamlessly anything you can draw in Visio. Take a look at the picture to the right to get a feel for the experience:

Visio Services enables you to navigate diagrams using easy to use and familiar metaphors for panning, zooming, switching pages, following hyperlinks and discovering shape data. You can also open any Visio Web Drawing in Visio using the “Open in Visio” button. Note that the person viewing the diagram can do so:

  • …in any browser (Internet Explorer, Firefox, Safari etc…)
  • …on any platform
  • …without leaving the browser
  • …without installing Visio, the Viewer or the Drawing Control
  • …without needing to accept multiple dialogs or browser warnings

Also note that because the diagrams are stored in SharePoint document libraries, diagram creators get a variety of useful document management features from SharePoint such as diagram access control using permissions, diagram change tracking using versioning and the ability to attach diagrams to SharePoint workflows.

Refreshing data-driven diagrams

Visio Services has ported Visio’s data connectivity features to the browser! In case you’re not familiar with those features please take a look at “Show it like it is: connect data to your Visio diagram” for a quick summary. Note this demonstration is in done in Visio 2007, but these features are also available in Visio 2010.

In a nutshell, before Visio Services renders a data-driven diagram it fetches the diagram’s linked data from an external data source and updates diagram visuals accordingly. Note that once posted to SharePoint, your diagram is a living document that will always represent the current state of your data visually. You never need to update manually again!

Visio Services supports refreshing diagrams connected to one or more of the following data sources:

  • SQL (using either Kerberos, Single Sign On & Unattended Authentication)
  • SharePoint Lists
  • Excel Workbooks hosted in SharePoint
  • Any OLEDB/ODBC data sources that have recent drivers

If the data source you plan to connect your diagrams to isn’t in the list above, don’t worry: Visio Services supports “Custom Data Providers” which enable you, with a few lines of code, to wrap your existing data source into one that Visio Services can consume. We’ll talk about writing your own “Custom Data Provider” in subsequent blog posts.

Finally, note that Visio Services supports refresh on open, user-triggered refresh as well as automatic periodic refresh.

[gratuitiously stolen from the Visio blog]

There’s also a series of recent posts that talk about how to install and manage Visio Services.
(The last one is the most important which has links to the Ops & Planning Guides for Visio Services)

image Register now for the Visual Studio 2010 Global Launch!

Microsoft Visual Studio 2010 launches on April 12, and you can be among the first to experience it in person. Discover how you can customize your workspace with multiple monitor support. Create rich applications for SharePoint and the Web. Target multiple versions of the .NET Framework with the same tool. Eliminate the dreaded "no repro" problem with IntelliTrace. And much more. Keep reading for event details and to register.

Visual Studio Launch Conference & Expo
Las Vegas, Nevada, USA – Bellagio Resort
April 12, 2010
Keynote: Bob Muglia, President – Server and Tools Business

Join us at the Microsoft Visual Studio Conference & Expo! Not only will you experience the launch alongside the Visual Studio team and industry legends, you’ll get three days of sessions by the best speakers in the industry on the latest and greatest technologies, such as Silverlight and .NET 4. Plus the Bellagio Resort is the perfect setting for our event. See you in Vegas!

All participants will receive:

  • One -year full membership to SSWUG.ORG, The SQL Server Worldwide User’s Group Help Center site. The site includes 1000’s of scripts, discussion boards, articles, reviews, email discussions and more.
  • Access to sessions from all three conferences
  • Official conference bag
  • Official conference t-shirt
  • Access to hands-on Computer Lab
  • Access to Exhibit Hall
  • Continental breakfasts
  • Lunches
  • Welcome reception
  • Conference CD: contains session white papers, slide presentations, sample files.

Registration:
http://www.devconnections.com/shows/SP2010VS/registration.asp?c=3&s=144
(For
$100 off, register with the code: MCP)

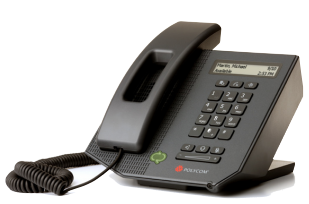
imageThis is the current object of my techno-lust.  It’s the CX300.  Why?  Why would I go ga-ga over a stupid desk phone?  Well clearly you’ve never used one in tandem with a Microsoft Unified Communications infrastructure.

  • FANTASTIC audio quality. 
    The speakers on this phone are good enough to play high def music through.  It’s head-over-heels better than our Nortel phones or my $200 speakerphone at home.  And since the connection is VOIP/Digital, I get CD-quality audio if I’m talking to another UC-enabled user who’s using Office Communicator.  The audio is as if the person was standing right next to me.
  • DIAL PAD.  Nuff said.
    Finally!  I own a CX200 – Polycom’s predecessor to the CX300.  It’s excellent in every way – except there’s no dial pad.  I have to dial the phone using Office Communicator and my mouse/keyboard.  BUZZZZ.  With the CX300, I can initiate a call from Office Communicator then if I need to enter in digits after the calls been made (PIN info, concall details, etc.) I can do so directly on the phone – which is what is intuitive to me as a user of phones for 35 years.
  • PLUG-AND-PLAY.  Done.
    I plugged this thing in, and it worked.  It did this on Windows Vista and it did this on Windows 7 – both 32-bit and 64-bit versions.  No driver install, no configuration, no nothing.  Brilliant.
  • I CAN WALK AROUND.  Untethered.
    I can’t stress how important it is to be able to use the phone ONLY WHEN I WANT TO.  I don’t have a headset off my ear, I just have to reach over and pick up the phone when I want to make a call or answer a call.  And I get my all-too-familiar dial tone when I pick it up.  Glorious. 

This phone is basically about $130 and it has nothing but a USB 2.0-cable off of it.  It plugs into your desktop/laptop and immediately becomes the conduit by which one can make & receive calls using Office Communicator as the “intelligence” behind it. 

The following is a review that was posted to the Office Communicator Team blog.  I don’t particularly care for the formatting of their blog so I’m reposting their entire review here.

Device Highlight: Polycom® CX300

While most of the time we focus on Office Communicator from a Software perspective, it’s easy to forget that really good phone experiences come from pairing Office Communicator with great devices!

For this post we’re going to take a look at a device that the Office Communicator team worked hard on to get just right, the Polycom CX300.

This device is my preferred device at work, as it has some really great acoustics from both the headset and the speakerphone.  It provides me with that much needed hardware interaction that I’ve grown up with that I just can’t seem to get with a headset.

While I use this device day to day, I’m finding some neat tips & tricks that I wanted to share with you.  For those of you who have this devices already, these tips will improve your experience.  For those of you who don’t, these tips will provide an overview of the great user experience.

  • Quick Calling
    This device behaves just like a regular phone, so pick up the handset and dial a number.  It just works!  Also if you wish to verify your number before placing your call, just dial the phone number you want to call, review it in the display, and pick up the handset (or press the speaker button). Your call will start.
  • Interaction with Office Communicator
    As this device was designed to work with Office Communicator, it has some really nice features to keep you connected.   The first and most prominent of which is the big presence light on the front of the device.  This light is your presence so you can at a glance know what your presence is.

    Even further as this device is your primary device for Office Communicator, when you click the toast on your desktop the call is picked up on the speaker phone of the device.  You could pick-up the handset to answer the call if you wanted too as well.

  • Voicemail
    One thing that I find really convenient about this device is the interaction with voicemail.  The device has a voicemail indicator right on the 1 key that lights up when you have voicemail.  Then when you want to call your voicemail you can just press and hold the 1 key to call!
  • Rejecting a Call
    Everyone gets those calls that you just can’t answer right now, whether you’re in a meeting or trying to concentrate on finishing up a last minute presentation.   When you need to reject a call fast, just hit the backspace key.
  • Multiple Calls
    You’re on a call with someone and someone else calls you. What do you do?  You can accept the call from your desktop by clicking on the “toast”, or just press the Hold key on the device to switch to the new call!  This button will put your current call on hold, and automatically accept the incoming call for you.
  • Advanced Device Settings
    One of the features that not many people know about is that the device has settings that you can modify.  Although most people will never have to change a setting, you may want to configure your own personal preferences.

To get to the settings, unplug your device from your desktop and plug it back in again.   When the device lights up, press the 5 key to enter the settings.  From there follow the onscreen directions.

Settings you can change:

  • Rate at which volume is increased or decreased using the volume buttons on the device
  • Whether you wish to remember the previous volume level of your last call, or to reset to the default volume level.
  • Size of the text on the display

For more information:

« Newer Posts - Older Posts »

Categories